How to deploy
Upload with a TFTP client
The device comes with an integrated bootloader which enables firmware updates via TFTP. The bootloader uses the assigned MAC address written on the label on the bottom of the eWicht enclosure.
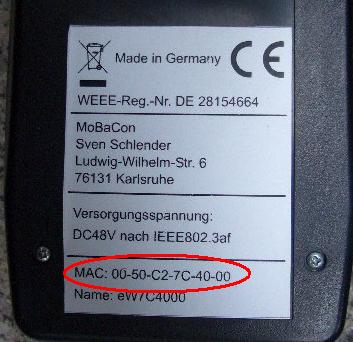
The IP address is set to 192.168.97.60.
These default addresses are statically defined and can only be changed by recompiling the bootloader itself. The only services that are available during bootloader operation are TFTP and ARP. ICMP (ping) and other services are not implemented.
TFTP operation on clean or faulty devices
On clean devices the bootloader is active by default. The active bootloader is indicated by a fast blinking link LED.If an application is installed the bootloader stays active after power cycling until the power button is pressed.
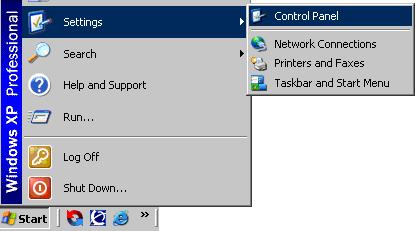
To access the bootloader directly, the bootloader's IP address must be on the same subnet as your computer. For the default 192.168.97.60 IP address, you must temporarily change the settings on your PC.
The following instructions assume you are using Microsoft Windows XP and will vary for other operating systems.
- Open Network Connections.
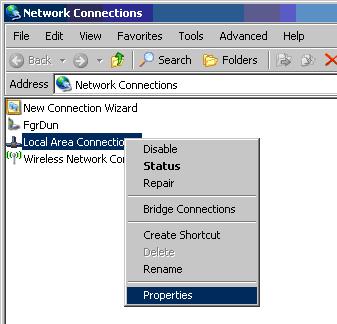
- Right click on the network adapter that you are using to communicate with the bootloader and choose Properties.
- Select Internet Protocol (TCP/IP) and click Properties.
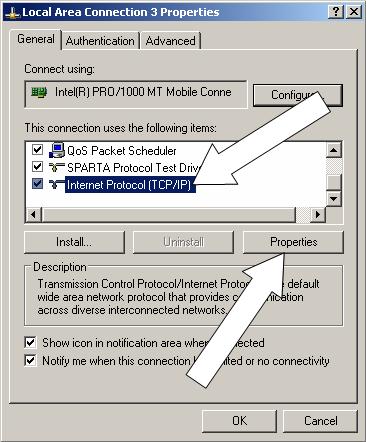
- Select Use the following IP address and then enter the IP address 192.168.97.61.
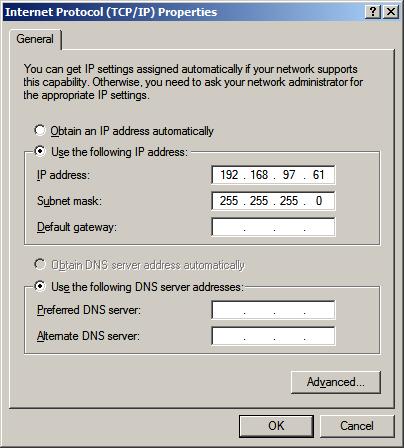
Click OK and then Close on the previous dialog to close them and set the new address.
After completing the TFTP upload process, restore your PC's IP address settings to allow normal network activity and access to the application you bootloaded.
TFTP operation on clean or faulty devices
If the running application is compiled with the Reboot module of the Microchip TCPIP Stack, the build process can be started sending TFTP packets to the device. Once a TFTP packet received the device enters the bootloader automatically. IP address and MAC address of the application are adopted by the bootloader. Therefore no network settings must be changed in case the device application was accessible before.TFTP Operation
Most operating systems come with a TFTP client built in. In Microsoft Windows, this utility is named tftp.exe. This utility is a very simple console application which can be used to upload your application .hex file over the network to the bootloader. To perform a Flash upgrade using the tftp.exe client, follow these procedures:
- Enter the bootloader mode like described above.
- At a console, execute the following command. Make appropriate path changes to the hex file.
tftp 192.168.97.60 put "eWicht.hex"
- If successful, the TFTP client will indicate how long the transfer took.
- The bootloader does data read back verification shortly after writing and does not need a second step to read back the Flash contents. If a verification error occurs, the error will be immediately reported to the TFTP client.
With the ICD2
When a new bootloader must be programmed or you want to debug an application you have to connect with a programming device like the ICD2.Before connecting the enclosure of the eWicht must be opened:
- Remove the cap of the rotary encoder and ease the fastening nut.
- Remove the rotary encoder button.
- Unscrew the 4 screws on the backside of the enclosure.
- Now you can open the enclosure and look at the PCB of eWicht.
The 5 wire (VCC, GND, PGD, PGC, MCLR) interface of the ICD2 must be connected to the pads (see the red circles in the picture below).
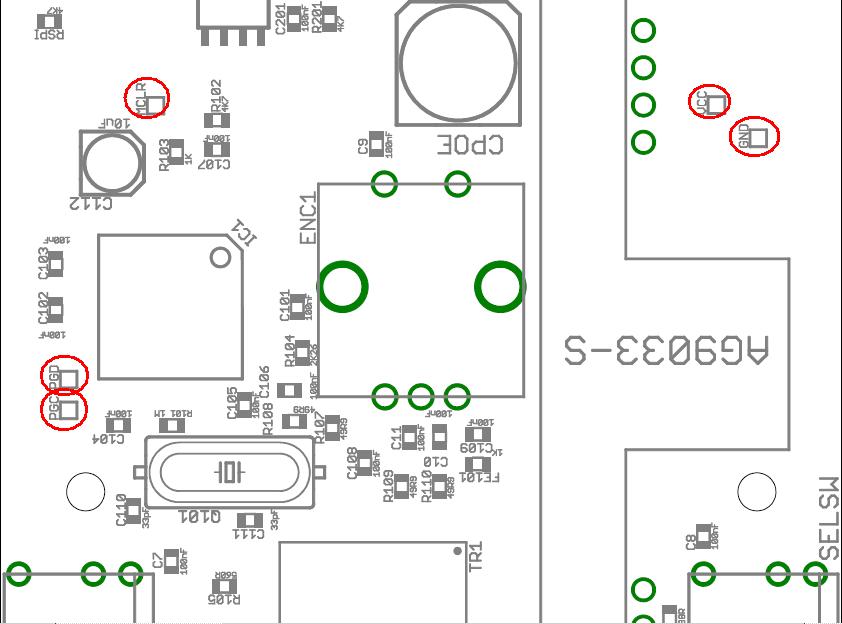
Cutout of the eWicht top placement
Important Note: VCC must NOT be powered from the ICD2. Use an external 3.3 Volt power supply instead!
If you have problems connecting to eWicht C107 should be removed.
